
Ever get ready to pack for a trip and go to look for bags to put things in? Newspaper sleeves for shoes? Check! Something to put your unmentionables in just in case TSA wants to take a little look-see in your bag? You could use more plastic bags, but why not take a few minutes to make a few of these ripstop nylon packing bags? When I travel, or even at the gym or pool, I use them to keep things clean and available without being quite so visible. They return home with dirty clothes – or wet swimsuits – and get tossed in the laundry and are ready for use again.

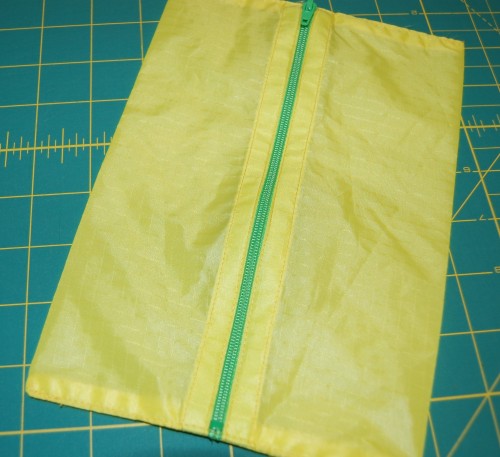
I start with a rectangle of ripstop nylon and a plastic/nylon zipper. If you are not familiar with it, ripstop nylon has these little boxes woven through the fabric. The slightly heavier lines are designed to stop ripping, hence the name. It is available at stores that stock a full range of fabric types. Where I am, I can buy it at G Street Fabrics and Joann Fabrics, in the utility fabric section.
The size is adjustable, but in general I start with the height of 1.5” longer than the zipper I’m using and the width twice what you wish plus 2 inches. Folded over like the photo above gives you a general idea of the proportions of the finished bag. If I box the corners, it will make it a bit narrower, so this will end up roughly the shape of a shirt box, which is what I was aiming for. I was going to use a 14” zipper, which really is closer to 15” long including the extra tape, so my large piece of ripstop nylon was roughly 15.5” by 32”. Well, my piece was actually 34” wide, so I left those 2 extra inches – this is a packing bag so there is lots of leeway. Here’s how to make a bag.
 1. Identify the edges that will go along the zipper and turn them under about ¼ “ and then another ¼”. I eyeball this on my cutting mat – and if it is closer to ½”, that is OK. This is only a packing bag.


Next I top stitch close to the edge. I have learned that there is too much fraying if I don’t enclose all of the edges. I use my edge stitch foot. Be sure that both opposite sides fold into the center.

2. Insert zipper – Line up one of the edges that you just finished along the side of the zipper with the folded portion against the zipper tape. Again I use the edge stitch foot and sew pretty close to the zipper. The foot might get caught going over the metal stops of the zipper, so just ease it over those parts.

I start with the zipper open and then, with the needle down, lift the presser foot and zip the zipper, and then continue. After one side, attach the other side. When done, and the zip is closed, you have a tube.
3. Fold the tube with the zipper at one side and use a pin to mark the other side.

Then shift the tube so that the zipper lines up with the pin.

Still with the right side facing out, flatten out the unit and sew a quarter inch seam across the top and the bottom of the bag. Note the stitching in the photo.

4. Turn the bag inside out and sew a ⅜” seam to enclose the previous seam that you just sewed. Be careful to stay away from the metal portions at the top and bottom of the zipper. Ask me how I know…hit the metal and you break the needle…or worse.


These are French seams. There is no reason that you can’t do ¼” and ½”. The important thing is that the raw edge is caught in the second seam.

Congratulations! You have completed a basic bag. My first bags – version 1.0 did not have enclosed seams and they frayed too much. Travel bags 2.0 were like these. I top-stitched along the top and bottom fold, being super careful not to let the needle hit the metal stops.
5. Want to go for Ripstop Nylon Packing Bags 3.0? These are not flat but rather have boxed corners. This is like boxing the corners of any bag except that you start working with the right side out and match the top seam with the side seam. For these large bags I sewed where it was 3” across.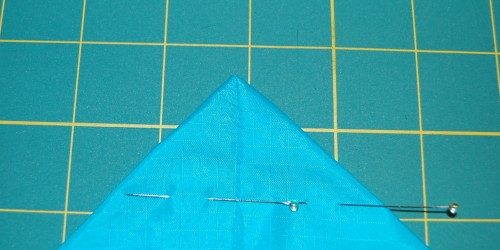
I did that for all 4 corners, and then I sewed an extra reinforcing line of stitching, just because. It makes me feel a bit better before actually cutting the fabric.

Now it looks like it sort of has little kitty ears.

Trim the kitty ears about ¼” from the seam (or the second seam if you did that), then turn the whole bag inside out and sew another line of stitching ⅜” from the first, enclosing the raw edges. Because this is along a diagonal, this line of stitching will be longer than 3”.

Turn it right -side out again…

and here is what you have…a packing bag large enough for shirts.


To make smaller bags, follow the same general guidelines…
height = length of zipper + 1.5 ”
width = 2 times desired width +2 inches
Adjust the length of first boxed seam to your desired depth of bag.
If you make some bags please tag me @tinkingalong, as I would love to see them!
Pack away!


Great tutorial, I’ll be looking out for rip-stop fabric next time…
This is awesome! Thanks, Lynne!
Fantastic tutorial! I’ll be picking up some rip-stop fabric as well!